If you are like me then you probably know where to find some of the best shots you have taken, but if someone asks you to find pictures of Great Aunt Mildred you would look in despair at your hard drives containing thousands of photos and wonder how you will do it.
Over the years I have taken a lot of photos and I recently went through a process to get all of them loaded onto the same place so I can start organising them better. Now I want to be able to find images easily, whether I am looking for my best shots, a particular person, a place, or even an event such as a wedding or birthday celebration. I’m not expecting this to be a quick or easy process, but I think it is something worth doing to ensure my images are more useful to me.
I already have a basic file based organisation system where I create folders for my images based on the year, date, and a brief description. This at least lets me find events and certain types of shots if I have a rough idea when I took them, but it is not always easy to find the shots I want.
In this article I will walk you through the process I am using to organise my photos and make them more searchable and useful.
Now my folder structure looks something like this:
- Photos
- 2025
- 2025-01-04 Family shots
- 2025-03-07 London Visit
- 2024
- 2024-03-06 Trip to Paris
- 2025
All the photo management software I have used lets you create this kind of structure automatically when you import images from your SD card, this saves a lot of messing around arranging things later and at least gives a clue to when the shots were taken and the main subject.
I learnt years ago that “year-month-day” is the best way to put the date into a folder name as it lets you sort them by date in Finder or Windows Explorer. By naming them this way you can sort the name alphabetically, which just so happens to then sort all the folders by date. This trick works whether you use dashes or not, just make sure to be consistent.
As of today I have 44,964 images arranged this way on a single drive. I started out with duplicate files spread across multiple drives so I’ve already been through a painful process to consolidate all the duplicates, one I plan to share in a future post. Do bear in mind that I am not a pro photographer, so you can decide for yourself if my plan is right for you.
While my folder system was a good star, I quickly realised it wasn’t enough to tackle the sheet volume of files and the complexity of finding specific shots. That’s when I knew I needed a dedicated photo management tool to help me.
The Hunt for the Perfect Photo Organiser (No Subscriptions Allowed!)
So, what do I want to do now I have all these images together? My main objectives are:
- Make it easy to find images with a particular location, subject, theme, or person.
- Rate my images so I can pick out the best to use for things like social media, printing, or putting on my website
- Make it easy to browse the images without having to go through all the folders opening images one by one
So, you might think that this sounds like something you would typically use Lightroom or Capture One for, and you would be right, however I have one more requirement:
- No monthly subscription
The reason for this is that I don’t want to be tied to having a monthly subscription forever just so that I don’t lose all the effort I put into organising my photo library. I know the monthly fees are not that expensive, and I do have a subscription to Capture One, but you never know what might happen in future. In future I might want to switch to another software, or Capture One might be bought out by someone who triples the monthly fees. So, with these requirements in mind I had a look around and came up with a short list of possible solutions:
- Acdsee Photo Studio for Mac (commercial software)
- Darktable (Free and Open Source)
- digikam (Free and Open Source)
All of these should let you achieve what I want to do, editing photos, adding tags and ratings to images, and providing a way to browse the folders. I am sure there are 1000 other tools I could also look at, but these are the ones I am more familiar with.
I quite like Acdsee Photo Studio, I used version 7 a few years ago and got on with it pretty well, except the non-destructive workflow was a bit complex as it created copies of images all over the place. In the end I was tempted away by other software and ended up on Capture One after trying others such as Luminar. It looks like the latest version 11 is a big improvement and also includes some AI features such as face recognition, something that would be quite helpful for me. While there is no subscription they do release a new version every year that you need to purchase if you want the latest features. If you are lucky you can get this on sale at around $60, so it works out about $5 per month. My version 7 still works fine, so I could just consider this a one off purchase and it should last me for years.
Darktable is an open source software that fills the same niche as Capture One or Lightroom. It has a fully non-destructive workflow, but it works in quite a different way to other software and is definitely better for someone willing to learn a new way to work. As it is open source it is free, with no up front or monthly costs. Darktable runs on Windows, Mac, and Linux, so you can easily move between systems.
Digikam has a similar set of features to both the above software packages, and it does have some very useful features such as face recognition and automatic picture rating. I have spent some time trying to get used to Digikam but the workflow is very disjointed, for example, if you make edits to a RAW file it saves the edit as a new JPEG file rather than storing the picture edit settings, this means you can’t come back and tweak it later, you just start all over again. It is pretty confusing trying to open the Raw editor and it only seems to have rudimentary editing tools compared to the other options.
Based on my experience with Digikam I have easily ruled it out, but I was a little torn between Photo Studio and Darktable, mostly because the AI tools in Photo Studio could make organising my photos much easier. In the end I have decided to start with Darktable as it is powerful and free, then if I hit a roadblock I will investigate alternatives more.
| Software | Pros | Cons | Reason to Choose/Reject |
| Acdsee Photo Studio | Good features, AI, no subscription (yearly purchase) | Non-destructive workflow complex, yearly purchase for updates | Considered, but Darktable won out for being free and powerful |
| Darktable | Free, open source, non-destructive, cross-platform, good community | Steep learning curve, different workflow | Chosen! Powerful and free, good long term solution. |
| Digikam | Free, open source, useful features (face recognition, auto-rating) | Disjointed workflow, RAW edits complicated, rudimentary editing tools | Ruled out due to editing and workflow limitations |
One of my main aims is to have a long term solution for cataloging my photos and so it seems that whatever option I go for there is always some risk. Even open source projects do sometimes disappear if their developer community disappears, or the features may be changed in a way you don’t like on the whim of the developers. Having said that, Darktable is very popular and is being updated regularly so I’m not worried that it will disappear any time soon. A major benefit for using Darktable, and one reason why it can be a long term solution, is that it saves all the image ratings, keywords, and editing data into small text files alongside your images. This is crucial because even if Darktable disappeared all my hard work (ratings, keywords, edits) is not locked inside a proprietary database, it is right there with the image file, making future migrations much simpler (or at least possible).
Unleashing the Power of Darktable: My Cataloging Toolkit
To get started with Darktable I added my main photo storage folder to the Darktable library and imported all my images. This process just reads all the data from the image files into the Darktable database but leaves the image files where they are. There is a way to import files that will copy them into new folders, but as my images were already arranged by date I didn’t need to worry about this.
This was pretty easy to do:
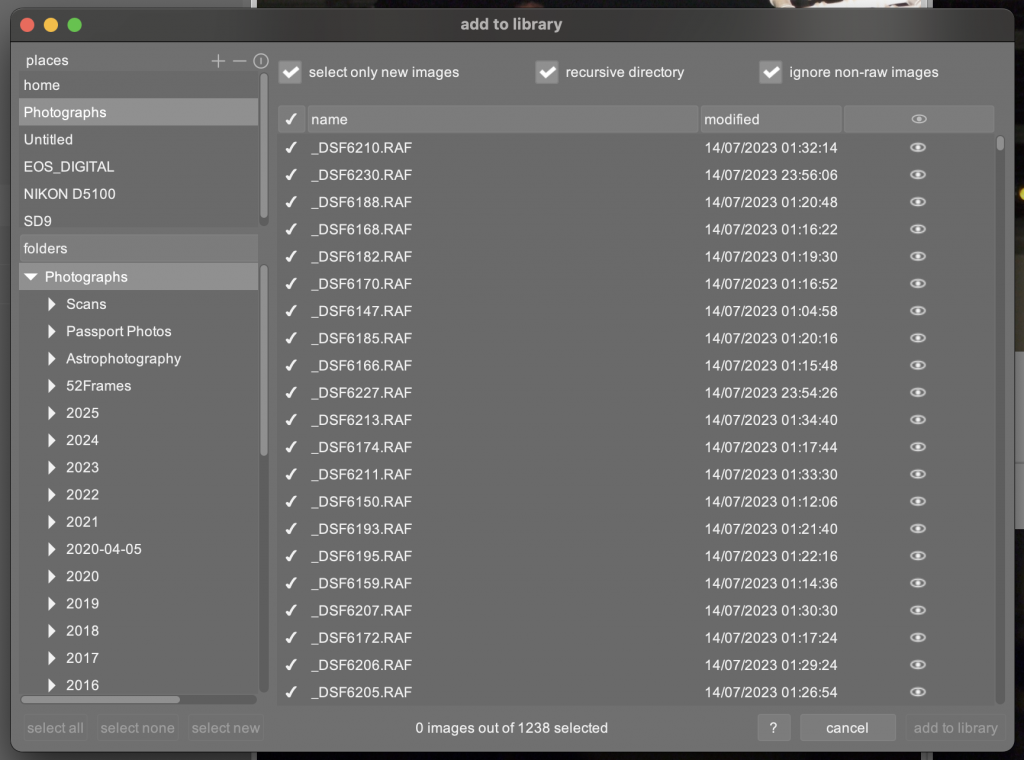
- Click on the “add to library…” button at the top of the main Darktable window
- In the window that appears click on the + in the places section and add your main photo library folder
- Tick the “recursive directory” button and wait for it to find all your photos
- Select all the files then click on “add to library”
Depending on how many photos you have this might take some time.
After adding all 45,000 images I had a look around and found I can use the following features to help catalog my photos:
- Star ratings – rate an image from 0-5 stars, you can also mark an image as rejected
- Color labels – assign one or more colors to an image
- Keyword Tagging – This lets you add as many descriptive words to the image as you like, for example, “mountain”, “food photography”, or “mum”
- Metadata – edit the title, description, creator etc for each image
- Geotagging – manage and view any GPS locations stored in the images.
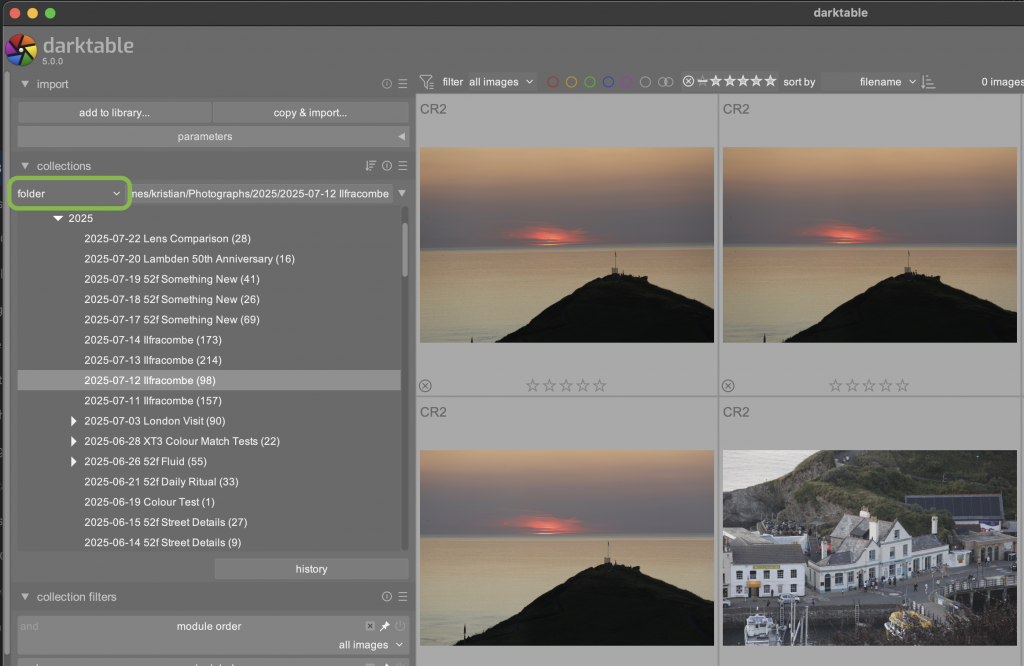
Now that the images are imported into Darktable I can already easily browse them by folder, and because Darktable is able to read the data that is built into most digital photos I am able to view photos based on a number of different criteria:
- Capture date
- Camera
- Lens
- ISO
- Focal length
- etc
The filters in Darktable are really useful, I can filter by folder then add an extra filter for star rating, camera, or just about anything else you can think of.
This is a good start and helps me to find images, but it doesn’t yet make the images searchable based on what is actually in the image. This is the next step to look at, and where the rating, colour labels, and keywording will be the main ways to add extra details to my images.
Shoot for the Stars!
Before diving in and adding details for every picture I think it is good to first of all filter out any images you don’t want to keep. There is no point spending time adding keywords to a photo that is blurry or was accidentally taken in your pocket.
In my approach I am working folder by folder and first of all reviewing all the images so I can give them each a star rating. My rating system is shown below, of course you are welcome to come up with your own scheme:
- 5 stars – The best of the best, the shots you are most proud of
- 4 stars – great shots that you would be happy to use in a portfolio
- 3 stars – good shots, interesting but not portfolio material
- 2 stars – technically competent photos that are not very interesting
- 1 star – technically poor photos that aren’t worth keeping, for example, severly out of focus shots
- 0 stars – not rated yet
There is no super quick way to do this, you just need to look at each photo and assign a rating based on how you feel about it. Working folder by folder should let you choose the best for each subject as you will hopefully have all the photos from one day or session all together.
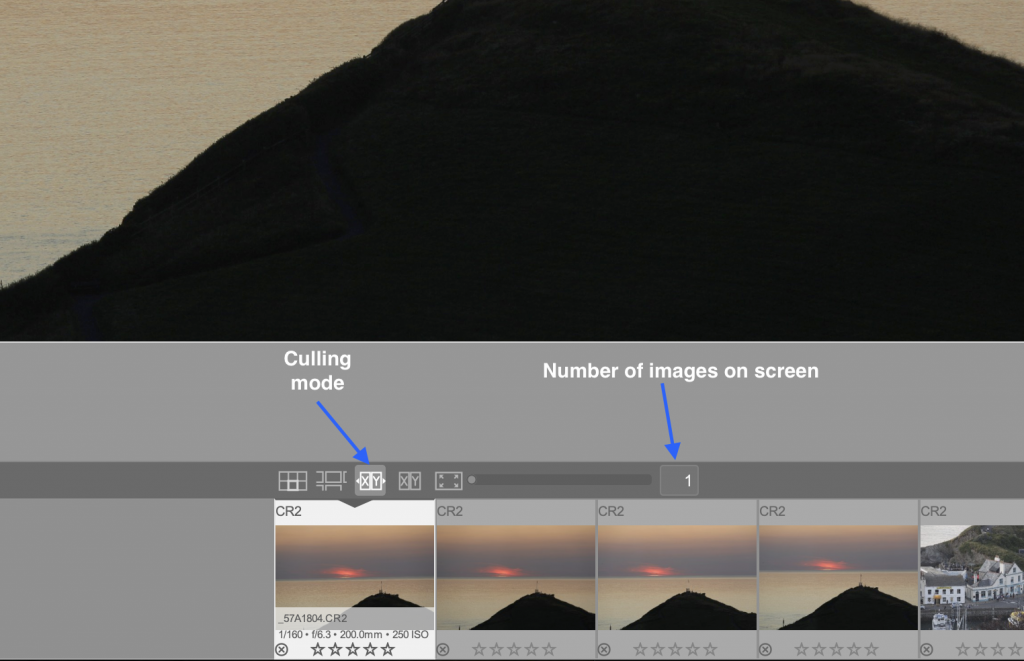
A good way to do this is to first select the folder you want to work on in the collections module, then to enter culling mode by pressing X or clicking the icon at the bottom of the browser pane.
When you are in culling mode you can set the number of images to 1 using the slider at the bottom of the screen, then work through each image using the left and right arrow keys and assign a rating using the number keys 1-5. If you want to zoom in closer to check focus or anything else you can hold down W for a preview, or use ctrl+mouse scroll to zoom in and out. If you have an image that is a complete waste of disk space, such as an accidental shot or something completely out of focus you can also hit R to reject the image.
What I tend to do is have a quick pass through a set of images and set bad images to 1, technically OK but boring images to 2, then the rest to 3 unless I spot something I really like which gets a 4. You can then filter to see only your 3 or 4 star images and see if you want to upgrade or downgrade any.
Once you have your star ratings in place you can choose if you want to delete your rejected and 1 star images. I admit that I rarely do as I have plenty of storage for now, but of course they are easy to find in future if I change my mind.
Now that all your images in a folder are rated you can move on to the next step, adding keywords.
Keyword Tagging: The Powerhouse of Search!
Adding keywords to your images is the most crucial part for searchability, it is also the most time consuming so you want to be sure to get it right before you start.
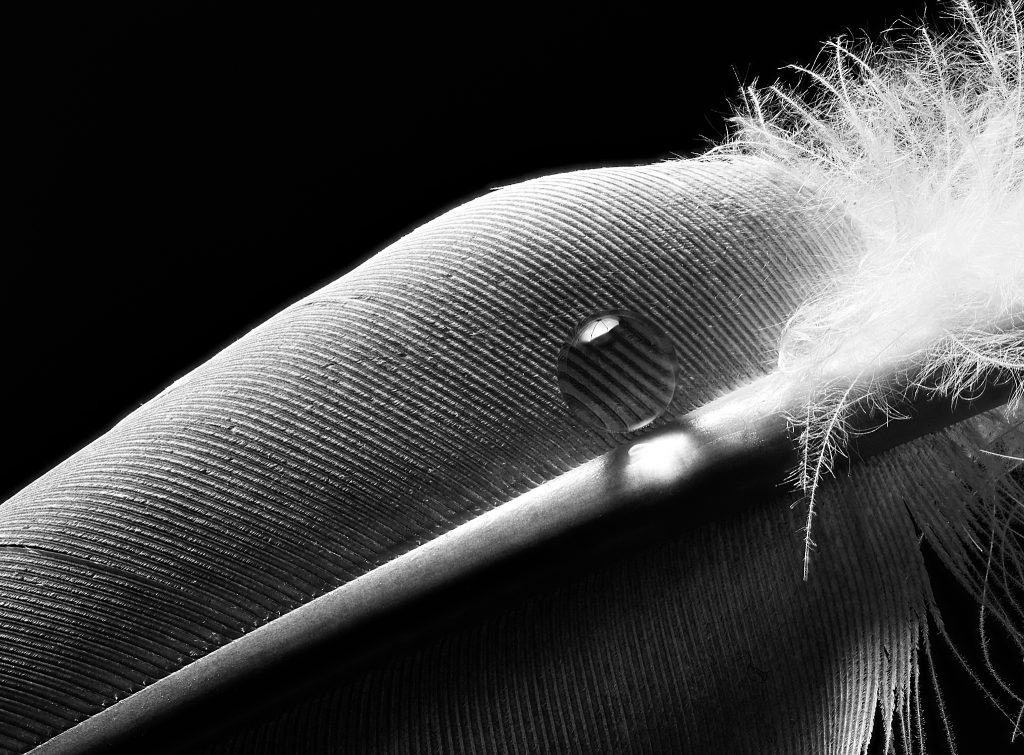
The general idea is you briefly describe what is in the image through the use of keywords. For example, for the image below I may want to add the tags Feather, Waterdrop, Macro, FocusStack, BlackAndWhite.
An important point to consider before you start to assign keywords is what you want to achieve by tagging your images as it will be much easier to tag as you go along rather than realising you missed something important and having to revisit each image.
The key things I want to achieve by tagging my images are:
- Find images of a specific person
- Find images of a place
- Find images of an event e.g. a wedding
- Find images of a certain type of subject, for example, flowers, sunset, or horses.
- Know what camera, lens, film type, and scanner was used for analog film photos
- Assign images to different ‘projects’ such as Family Album, Photos to Print, or Portfolio
- What techniques were used, for example long exposure, or infrared.
Once you know what you want to do with your images it is much easier to decide how to tag them. I recommend to organise tags according to the questions you can answer:
- Who – the people in the image
- What – The subject(s) of the image
- Where – The location the image was taken
- Why – Was this for a specific project or for social media etc
- When – Was the for a specific event such as a birthday?
- How – What techniques did you use? Examples include HDR and focus stacking
On top of this you might want to add extras such as:
- Style – Is the image in a specific style, such as street photography, or still life
- Status – Is the image edited or waiting to be printed?
- Project – Is this part of a larger project, or part of a family album?
If you like you can just add keywords directly with no structure, but I prefer to set up a keyword hierarchy to organise the keywords into folders so they make sense.
It is not always easy to work out which keyword should go where in a hierarchy, so to avoid having to change it later I have spent quite a while thinking about how to organise my tags. The example below shows the main categories of tags along with some examples for each category:
Event
-->Holiday
---->2025 Seaside Break
-->Party
---->2024 New Years Eve
---->2020 BBQ

Gear
-->Camera
---->Olympus 35RC
-->Film Format
---->35mm
---->Medium Format
-->Film Stock
---->Ilford HP5
-->Lens
---->CZJ Biotar 58mm f2.0
-->Scanner
---->Minolta

Location
-->Australia
-->UK
---->London
---->Bristol

People
-->Family
---->Uncle Bob
---->Aunt Alice
-->Friends
---->David
---->Jane
-->Me

Project
-->Family Album
-->Portfolio
-->Social Media
-->Website

Status
-->Edited
-->ToEdit
-->ToPrint

Style
-->Abstract
-->Fine Art
-->Low Key
-->Still Life
-->Street Photography

Subject
-->Activity
---->Hill Walking
---->Sailing
-->Architecture
---->Bridge
---->Church
---->Door
---->House
-->Fauna
---->Bird
------>Duck
------>Pigeon
---->Cat
---->Horse
---->Monkey
-->Flora
---->Fern
---->Fungus
---->Tree
-->Landscape
---->Beach
---->Cityscape
---->Countryside
---->Lake
-->Object
---->Bicycle
---->Book
---->Feather
---->Pen
---->Shoe
---->Feather
---->Shoe
-->Visual
---->Fireworks
---->Rainbow
-->Weather
---->Frost
---->Snow
---->Storm

Technique
-->Focus Stacking
-->Infrared
-->Long Exposure
-->Macro

Time
-->Daylight
---->Night
---->Sunrise
---->Sunset
-->Holiday
---->Christmas
---->Easter
-->Season
---->Spring
---->Summer
Of course this is only an example, once you have the main high level keywords and any obvious lower level keywords set up you can fill out the lower level tags are you go along. For example, before you start you could add your home town to the Location folder, and add your family members and friends to the People folder.
The key is to decide how much detail you want to go into, and how you will tag your images. For example, I may have the tag “Clouds” but I would only tag images where clouds are the main subject or an important part of the image, not every image that happens to have a cloud in it (which would be most where I live). You may decide you only want to tag people or locations and that is perfectly OK so long as you spend some time to consider it. Do bear in mind that it will be much easier to add extra tags as you go through your images for the first time than it will be to go through them all again later adding a new tag if you decide you need it.
In the screen shot below you can see two images and how they have been tagged. Note the list of applied tags in the top part of the “tagging” tool and the list of available tags in the bottom part.
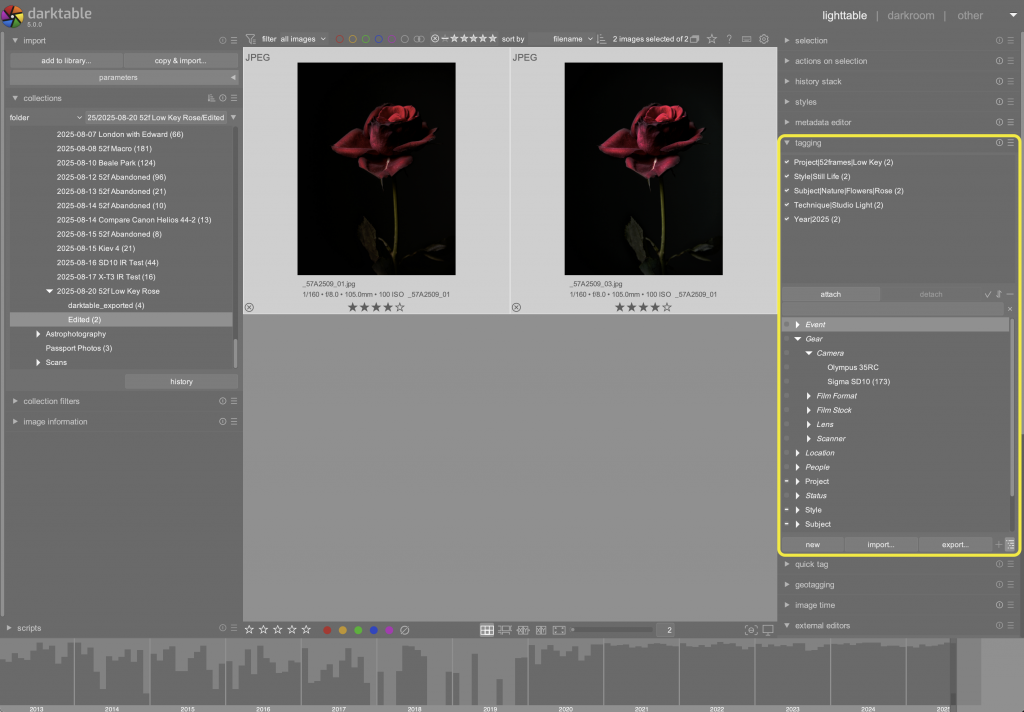
Tags can be applied to multiple images at the same time, so this really does speed things up when you have a folder full of similar images that you can tag all together. All you have to do is select all the images you want to apply a tag to then double click the tag in the list, or add a new one.
I recommend to have a read up in the manual for the software you are using, whether that is Darktable or Lightroom, they all have their own quirks.
You may have noticed the “import” and “export” buttons at the bottom of the Tagging tool, this allows you to export your own set of tags, or more importantly allows you to import a tag structure into Darktable. I have put together a simple starter set of tags that you can import and play around with to learn more about how tags work.
You can download the tag file here:
This is just a text file so feel free to open it in Notepad or some similar software before importing if you are worried. To import just click the “import” button in Darktable and select the file. I don’t recommend importing if you are already tagging your photos as I don’t want to break your existing setup!
An Incremental Approach
If you have a large photo library that needs to be rated and tagged then don’t try to do it all at once, that would be a surefire way to abandoning the project. My approach is to make sure that any new photos I take are rated and tagged, then gradually working through the older images one folder at a time as my schedule allows.
Even if I spent only 10 seconds per image then my 45,000 images would take 125 hours to fully catalogue. I can’t imagine enjoying sitting for hours doing this, so little and often will be the key words here!
You can always prioritise certain photos if you have something in mind. For me it might be a trip to Australia in 2012, or recent photos of my boys. Only you can decide where to start with your library.
What This Means for My Photo Future
As we have talked about above, there are some big benefits to getting your photos organised, for example:
- When we want to find photos from our seaside holiday in 2023 when we went to the dinosaur park I can simply search for ‘2023’, ‘dinosaur park’ and up come all the relevant photos.
- If you want to find a good photo to post on social media you can filter by 5 star ratings and any keyword you want then you are ready to go.
Beyond the ability to search for memories or photos to share this is also about making your photos into a valuable and usable resource rather than a big mess. Photos help to capture a moment in time, and are of no use to anyone if they are lost in a black hole on a hard drive and never seen again. By organising your catalogue you are taking back control of your images and no doubt discovering a lot of hidden gems along the way.
Hopefully this guide has helped you in your quest to organise and future proof your photo library, it is still a work in progress for me but I’m sure I will finish it one day!
Have you faced similar photo chaos? What was your method to bring order to the madness? I would love to hear about your tips, struggle and triumphs in the comments below.
Good luck with what ever you are doing, and see you in the next post.
Kristian.